Showing posts with label Organization and DIY. Show all posts

Sunday, December 1, 2013

21 Day Organization Challenge


Starting today, I am participating in the 21 Days of Organization Challenge. I leave for Minnesota on December 22, so it seems perfect that I would spend the first 21 days of the month organizing my house. I figure that it's the perfect time-frame to use in order to ensure that I come back from my trip to an organized home - just in time to bring back loads of baby stuff and Christmas gifts! 

Join me if you'd like, or follow as I participate. I'll wrap up just before the New Year and see how I do!

Tuesday, April 23, 2013

Our Master Bedroom, The Interim

When we bought our house, the master suite was one major selling point for me. A large (but not overly) bedroom with an ensuite bathroom and walk-in closet. But, since our focus was on the main level kitchen and living areas, we knew no major renovation would take place. It was up to me to use decor and organization to get it looking its best in the interim. 

If you recall, the before shot of the bedroom:
This is basically what you see when you walk into the room.
This is a photo of the room shortly after we moved in. Just haphazardly decorated with mis-matched lamps and bare walls. After a few hours on a Saturday (and after Al re-wired my lamps for my new shades) I transformed it just enough to give it a pulled-together look. A few unique and kitchsy pieces make it feel home-y and warm. 
This is the view when you walk in now
Hamper - Flea market in Florida; 4-drawer dresser - Target; Memory foam rug - Lowes
{The dresser holds extra toiletries and blankets, sheets, etc... It was a great interim plan to before we can mount the TV.}
 Moving the bed to the this wall, opposite of the previous, opened up so much room for the reading nook.
Headboard - DIY; Sign - Sam's Club; Side tables - Walmart; Brown comforter & sheets - Target; Red sheets - Walmart; Accent pillow - Walmart
My lamps from the auction, with new wiring and shades.
Lamp bases - Auction; Lamp shades - Walmart; Decor tin - thrifted
My reading corner. This love seat is so plush and comfy and the little table came from Germany with my grandparents. And the pup loves curling up in his bed next to me! You can also see the open arch leading to the master bath (which is a post for another day!)
Love seat - second-hand; Table - second-hand; Dog bed - Petco; Accent pillow - DIY slip cover
This corner is behind the door, but had enough room for a dressing space. I can set out an outfit or two and prep my gym bag, briefcase, etc... (excuse the blasted blurry pic!)
Mirror - Walmart; Clothes hooks - ?? (since childhood); Rainbow Vaccum/Air purifier

We still have a long way to go in this room. We need to patch the walls and paint. We need to lay new floors (perhaps hardwood with a great rug or just better carpet.) We need to get more artwork and wall decor. And, overall, I just need to come up with better storage solutions and remove some of the clutter. For the interim, though, this is good enough for me. 

Monday, April 22, 2013

Our Dining Room

Some shots of our "finished" dining room.  The dining room is off the main room, tucked behind the main floor half-bath. It's a somewhat open floor plan, so you can walk through either side of the room. (You can see the living room in the background. The other direction is the kitchen.) 

I wanted the room to look breezy and cozy. Nothing extensive, just a nice place to sit and enjoy a meal with company. The table is "on loan" from a friend who said we could use it while we stored it for him. We're looking for a similar table as a long-term solution. 

I did a photo wall opposite the windows, with the table centered under the light fixture. A simple table vignette and a couple place mats really pulled it together. 
 A better view of the photo wall. I'm not totally happy since it's black and tan and we did this room in brown, blue and white. For now, though, I'm glad to have things up on the walls!
The center piece. Flowers, a candle and some candies in a milkglass vignette.
"Action shot" - We've really enjoyed the coziness of eating in the dining room together.
  The details: 
Curtains & curtain rod - Lowe's (clearance) / Silver platter and all milk glass - thrifted / Place mats - Kohls
Table - Pottery Barn (on loan)  

Saturday, March 30, 2013

10-minute project: Hair Accessory Corral

Since most of my bigger projects last week required another run to the store or construction help from Al, I found myself completing smaller, easier projects on my own. I had very little "spare" time this week, so projects like this one are perfect for the 10-minutes while you're waiting for your bath to fill or your nails to dry. 

For the past few months, my hair accessories have looked like this:
Chaos. Not only is it a sight for sore eyes it was nearly impossible to find the smaller items  at the bottom of the mess. So, I took 10 minutes and did something about it.

I remembered that I had this tupperware I picked up at a thrift store a couple years ago. I'd used it for lunches a couple of times, but the compartments were too small for my needs and it was shoved into the back of the tupperware drawer. 

In a moment of clarity, I realized it would work perfectly for those stray hair accessories.
And now my drawer looks like this:
The bigger clips, rollers, and combs are on the bottom and the bobby pins, hair bands, etc... are compartmentalized on the top. It slid back into the drawer perfectly!

It was a quick, easy solution that will keep those items in one place and save me precious time in the morning. Have you used something in a creative way recently?

Monday, March 25, 2013

Project Week: Kick-off and File Cabinet Organization

This week is going to be very busy for me. I am ramping up my day time with events and meetings and I am at the gym in the evenings twice as much as I normally am. As such, I decided this would be a great week to feature some projects I've completed around the house recently. They are all projects that can be done in a few short hours and (for the most part) use materials you have already laying around. 

Today, I am going to kick it off with an organization project I did in my office. You remember when I re-finished my file cabinet last fall? Well, at the time, I just threw my work files inside it and figured I would get to them "later." 
Last week, later finally came and I sat down (while watching a boring finance training video) to complete the project.

1. I pulled everything out of the cabinet and started making piles (as well as tossing unnecessary docs) 
The beginning. Stacks and stacks and stacks...

2. I then made a list of each pile of documents and created bigger categories
My list: 
1. Administrative (ORANGE)
2. Business Resources & Networking (BLUE)
3. Finance (PURPLE)
4. Legal (GREEN)
5. Volunteer & Memberships (PINK)

3. Then I made my labels, color-coded for main category and sub-category written-out

4. I then added the labels to the folders, clearly separating the main sections for ease-of use

5. Time to fill the files! 
Voila! Easy-peasy. The whole project took about two hours and the most tedious part was creating the categories. Every time I thought I was done, I'd find a new doc that needed to be added in. Now that I completed this project for my work-related documents, I want to go back and revamp my personal files using the same method. it is so much easier than simple alphabetization. 

Side note: I partially used this for inspiration, adapting the method to work for my needs. 

This is a great project for a grey day or when you're sick because you can get comfortable on your floor and get it done in mere hours. Have you done any organization recently that has made your life easier?

Tuesday, February 5, 2013

A Reveal: The Great Guest Bath Transformation

This project wasn't quite as fast as the kitchen remodel because both Al and I are working significantly more than we were those first couple weeks. This project happened over about two months, although the actual "working" time was only 4 days. I don't have an official before shot, because I simply forgot when we started the project. 

But I have plenty of other photos to make up for it:

Demo:

Floors are in: 
Getting closer: 

(Peel n' stick linoleum tiles for the vanity inside. Easy to clean and maintain. Any damage? Just pull and replace!)
Adding the details:


(Dry erase, so I can change them if I move them to another room!)
The final product:
Time frame: 4 days
Original budget: $20 ($5, if you ask Al)
Final cost: $120

The breakdown:
Tile -  $40 (clearance at Home Depot) (includes subfloor, mud, grout, & sealer)
Vanity - $19 at Habitat for Humanity ReStore, Painted with Cabinet Restorations left over from kitchen remodel, peel n' stick tiles on inside (Lowe's) / Sink - $8 at Habitat ReStore / Faucet - FREE (Pulled out of parents old bathroom, less than 1 year old.) / Counter (original) - Painted with Countertop Restorations left over from kitchen remodel / Light fixture (original) - Spray painted, Valspar Silver $5Shelf - $6 (On-hand, painted to match cabinets, added hooks from Walmart)
Decor items: Shower rod, curtain & hooks - $30 (Walmart) / Basket - $2 (thrifted, spray painted) / Tin buckets - $2 (Target $1 section) / Set of 3 mini candles, set of 2 pictures on wall, rock candle holder, towels & floor rugs - FREE (all previously owned)

Thursday, January 31, 2013

10-minute project: My business card organizer

Last weekend, I had a few minutes while I was waiting for a few computer updates, so I decided to tackle one of my little organization projects I had lying around. For the longest time, I've carried this pink leather business card holder, overflowing with cards I'd collected for over 6 years, in addition to a stack of my own. A month ago, it got so full that I couldn't even snap it shut. I knew a new system was in order. 

I just so happened to have an old coupon book sitting unused and decided that would be the perfect organizer for the business cards. First, I separated my cards from the other business cards and placed mine back in the pink holder. It makes sense that those cards will remain in my purse since you never know when you need to give someone a card. 

The remaining cards were divided into categories: 
1) House: my realtor, mortgage broker, plumber, and other necessary cards I need for home maintenance. 
2) Personal: my hair stylist, nail salon, and other cards that are personal to my interests. 
3) Business: my branch manager, colleagues, and important business contacts. 
4) Volunteer: my many Army contacts and other organizations. 
5) Family & Friends: for all those people you love that you want to help promote! 


I made quick labels and into the sections they went. The file has so much room to grow and allows me to easily find a contact when I need to make a call or schedule an appointment. It also accounts for all the odd-shaped or differently sized cards that people produce these days. Finally, it leaves my smaller holder free to hold all my personal business cards for on-the-go use. 

Linked up...
Dear Olympia Furniture Revivals

I took 10-minutes and on-hand supplies and remedied a disorganized mess. These are my favorite projects: a quick and simple solution that makes daily life just a little easier!

Thursday, January 24, 2013

In progress: My coffee bar

I have been plugging away at this for a couple of days now and it's still not done. I might be trying too hard to "style" the shelves like a pro and incorporate decorative elements, but I'm not willing to admit that quite yet. I still have a few things to add/try before I am calling this project complete. Currently, the coffee bar is in this state: 
And over the weekend, I am going to work on this sign for the top shelf: 

I was lucky enough to find some canvasses on clearance at Michaels the other day ($5.99 for 2) so I snatched them up. Canvas is expensive, so I'll hang on to the other one until I have a new project. 

Once the project is complete, I'll share the details (what it looked like before, paint color, etc...) and maybe a DIY on the sign.

Any ideas on the coffee bar are welcome (and happily encouraged)!

Tuesday, December 11, 2012

Chalkboard File Cabinet Re-do

A few months ago, I bought this gem at the auction for $5. The guts were perfect, it was overall clean and well-maintained. But it was ugly (and didn't match my black & white office theme.) 

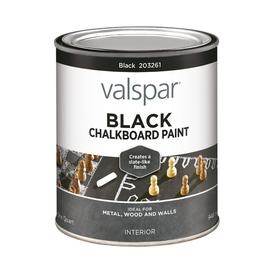
 So I decided to paint it black. But not just any black - chalkboard paint black.
Valspar Quart Interior Matte Black Chalkboard Paint

Coat 1 - Still splotchy in a few spots, but the paint goes on very easy and dried within 30 minutes.

Coat 2 - pulling the drawers out allowed me to paint edges and corners more easily. It also made the cabinet lighter when I carried it upstairs to my office later that day.

 The finished project! 
The can of paint is $15 and after this project (and one other small one) I still have 2/3 of the can. So, the total cost is approximately $7. The project took less than two hours, including dry time! Seriously, this was so easy!

The hardest part was, undoubtedly, finding chalk. I went to 7 stores. Yes, seven. Even Wal-mart was sold out, so I ended up finding it at Office Depot (and bought two boxes so I never have to look again!)

And, of course, my chalk writing needs some serious work. I see tons of pins and ladies who do a lot of chalkboard projects and they can do all sorts of beautiful lettering and designs. I doubt I'll have the time to really hone that skill. Whatever. 

I love my new file cabinet. Next up: building a new file system complete with color coding and labels! Sounds like a great Christmas break project!

Wednesday, November 14, 2012

DIY: Striped Candles

I decided a few weeks ago that I wanted a navy/white theme for decor in the kitchen. Mainly because the kitchen reno just doesn't feel like it will coordinate with brighter colors. I put this very simple tablescape together (if you can even call it that) and wanted to find some navy/white striped candles, inspired by these: 


Obviously, the price of these candles was out of the question. I found some at Target, but even those were more expensive than necessary, so I thought I'd make them myself. 
Here is the tutorial of that project:
Supplies
Small paintbrush (poly is best!)
Plain white candles
Navy blue acrylic paint
Thin painters tape
Total cost = $5
 Step one: create stripes with painters tape
 Step two: paint white spaces with acrylic paint (I needed two coats!)
Step three: Let dry for at least 4 hours (longer would have been better!)
 Step four: peel off tape
**At this point I noticed that the edges were jagged because the acrylic paint stuck to the tape. If I were to do this again (I probably will in a couple other colors) I would use spray paint for easier application and cleaner lines. 
 I was able, however, to scrape off much of the blue paint that had bled onto the white and once I did, the jaggedness of the lines didn't bother me too much. 
My new tablescape. Simple and clean. 
The project was super-cheap and really easy. With the exception of drying-time, it took less than 30 minutes. As I said, I would probably use different paint next time and let it dry a little longer. I plan on making some gold glitter striped candles for the table when I host Thanksgiving dinner!